When your WordPress website fails to send emails, it can disrupt critical functions like contact form submissions, order confirmations, or password resets, frustrating both you and your users.
Whether it’s due to server issues or misconfigurations, this is a common problem with straightforward solutions. At ONSiteWP Managed WordPress Hosting, we make email delivery effortless by including Elastic Email in all our plans.
For those who prefer a DIY approach, you can set up an SMTP plugin with your own email service. Below, we’ll explore both options to get your emails flowing smoothly.
Email Sending Included with ONSiteWP Managed WordPress Hosting Plans
At ONSiteWP, we take the hassle out of email delivery. Elastic Email for website sending is included in all ONSiteWP Managed WordPress Hosting plans upon request, and we take care of everything for our clients.
Our hosting servers have built-in SMTP functionality, so there’s no need for additional plugins or complex setups. Simply request Elastic Email activation, and our expert team will configure it for you, ensuring reliable delivery with minimal effort.
With advanced authentication (SPF, DKIM, DMARC) and seamless integration, your emails will reach their destination every time.
DIY Approach: Using an SMTP Plugin and Your Own Email Service
If you prefer to manage email sending yourself, you can use an SMTP plugin with your own email service provider (e.g., SendGrid, Mailgun, Gmail, or Elastic Email) and configure DNS settings for optimal deliverability. This approach gives you full control but requires some technical know-how. Here’s how to do it:
Why Emails Fail Without SMTP
WordPress’s default PHP mail() function is often unreliable because:
Server Limitations: Shared hosting servers may not be optimized for email delivery, leading to emails being flagged as spam or not sent.
Authentication Issues: Without SPF, DKIM, or DMARC, email providers like Gmail or Outlook may reject your emails.
Blacklists and Spam Filters: A blacklisted server IP or poorly formatted emails can result in blocked or filtered messages.
Plugin/Theme Conflicts: Certain plugins or themes may interfere with email functionality.
Form Misconfigurations: Contact form plugins like WPForms or Contact Form 7 may not be set up correctly.
Steps to Set Up Email Sending with an SMTP Plugin
Choose an Email Service Provider Select a reliable email service like Elastic Email, SendGrid, or Mailgun. These services offer SMTP credentials and robust deliverability features. Sign up for an account and note your SMTP settings (host, port, username, password).
Install an SMTP Plugin Install a WordPress SMTP plugin like WP Mail SMTP, Easy WP SMTP, or Post SMTP. These plugins allow you to configure your WordPress site to send emails through your chosen email service.
Go to your WordPress dashboard > Plugins > Add New.
Search for “WP Mail SMTP,” install, and activate it.
Configure the SMTP Plugin In your WordPress dashboard:
Navigate to the plugin’s settings (e.g., WP Mail SMTP > Settings).
Enter your email service’s SMTP details:
SMTP Host: Provided by your email service (e.g., smtp.elasticemail.com for Elastic Email).
Port: Typically 587 for TLS or 465 for SSL.
Username/Password: Your email service credentials.
Encryption: Choose TLS or SSL as recommended by your provider.
Save the settings and send a test email to confirm it works.
Update DNS Settings for Authentication To improve deliverability and avoid spam filters, configure your domain’s DNS records with the following settings (specific to your email service):
SPF Record: Add a TXT record to allow your email service to send emails on your behalf. For Elastic Email, include v=spf1 include:_spf.elasticemail.com ~all in your SPF record.
DKIM Record: Generate a DKIM key in your email service’s dashboard and add the provided TXT record to your DNS.
DMARC Record: Set up a DMARC policy (e.g., v=DMARC1; p=none;) to monitor and protect your domain. Access your domain’s DNS settings through your registrar (e.g., GoDaddy, Namecheap) or hosting provider, and add these records. DNS changes may take 24–48 hours to propagate.
Test and Troubleshoot
Test your contact forms, WooCommerce emails, or password reset emails to ensure they’re delivering correctly.
Check your email service’s dashboard for delivery reports or bounce notifications.
If emails fail, verify SMTP settings, DNS records, and plugin configurations. Ensure your server IP isn’t blacklisted using tools like MXToolbox.
Recommended SMTP Plugins
WP Mail SMTP: User-friendly with integrations for popular email services.
Post SMTP: Offers advanced diagnostics for troubleshooting.
Easy WP SMTP: Simple setup for basic email configurations.
Elastic Email DNS Settings (Optional)
If you’re using Elastic Email independently:
SPF: v=spf1 include:_spf.elasticemail.com ~all
DKIM: Add the TXT record provided in your Elastic Email account.
DMARC: v=DMARC1; p=none; (adjust policy as needed).
Why Choose ONSiteWP’s Managed Solution Over DIY?
While the DIY approach offers control, it requires time and technical expertise to configure plugins, manage DNS settings, and troubleshoot issues. With ONSiteWP Managed WordPress Hosting, you get:
Hassle-Free Setup: We handle Elastic Email integration and DNS configuration for you.
No Plugins Needed: Built-in SMTP functionality simplifies your WordPress setup.
Expert Support: Our team is available to resolve any email delivery issues quickly.
High Deliverability: Elastic Email’s advanced authentication ensures emails reach inboxes.
Conclusion
A WordPress website that doesn’t send emails can undermine your credibility and user experience. With ONSiteWP Managed WordPress Hosting, email sending via Elastic Email is included in all plans, and we take care of everything for you.
If you prefer a hands-on approach, using an SMTP plugin with your own email service and proper DNS settings can get the job done.
However, for a stress-free, reliable solution, let ONSiteWP handle it all. Contact us today to activate Elastic Email and ensure your WordPress emails deliver every time!
Email is a necessary part of doing business. When the person who you are sending the email to doesn’t receive the message, here are some questions to ask yourself:
Which email program are you using to send the email? Webmail email clients are pretty good at sending the email or telling you when you have a problem. Other email programs such as Outlook or mobile apps could have an “Outbox” folder where messages sit in a purgatory where you think you have sent them but they haven’t yet left your computer.
Are your messages going into your recipient’s spam folder or are they not being received at all? Even the best of us don’t check our spam folder on a daily basis. It’ good to remind the person to look for your message in there. If they find it, then they might be able to add your address to their contacts or setup a filter to never send spam from you into their spam folder.
Are the messages getting saved in your sent folder? Perhaps you were distracted and didn’t actually click the Send button before closing the compose email window. Having a copy of the Sent message will help with this next point…
Did you send the message to the correct email address? If you copy/pasted the recipient’s email, maybe you missed the first or last character. (think .co instead of .com) If you typed it by hand, maybe there is a typo in the outgoing address. Go letter by letter to make sure you spelled the To address correctly.
Did you get any bounce back from the email server? The bounce message might not come for a few minutes. It is great when you get a bounce because the reason for the bounce is within the message. It could be anything from you sending to a non-existent address (a To address typo), the sender’s account is over quote or suspended, or the receiving server’s anti-spam system kicked it back.
Hopefully these questions will help you narrow in on where the problem lies.
File this under problems that are hard to google. I want to make the answer for this OceanWP theme broken navigation link problem easier to find.
Single Page Website Navigation Links
Single page websites are sites where all of the content is on the same page. Sites like this usually still have a traditional navigation menu. The navigation menu links scroll you to various sections of the page.
This type of navigation is easy to achieve with HTML id attributes and #name href locations.
That sounds complex but it’s really not. Page builders like Elementor make this especially easy.
You first create your long web page.
Then somewhere in the middle where you want to hop, add a CSS ID to that section. The resulting HTML looks like:
<div id="tagname">...</div>
Then you create a link with a hash mark in front of the tagname like so:
<a href="#tagname">...</a>
The main thing to remember is the link uses the hash mark (pound sign) and the CSS id does NOT have it.
In the WordPress menu dashboard, you can create Custom Link menu items that have #tagname as the URL to create the inner page scroll effect from your main menu.
The Problem With OceanWP and Elementor Anchor Menus
OceanWP has javascript for some kind of smooth scrolling effect. For whatever reason, this javascript breaks the function of navigation menu links that have a pound sign in them.
The answer is to login to your WordPress Dashboard.
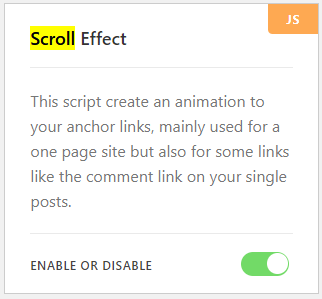
Go under Theme Panel on the left-side menu and choose Styles & Scripts.
Search through all of the boxes for Scroll Effect and disable it. It is turned off by clicking the green slider seen below so that it turns grey for disabled.
I hate “smooth scrolling” on a site too. I recommend you find the smooth scrolling box and turn that off.
Click the Save Changes button at the top of the page when you’re done.
A Note To Theme Developers and Front End Coders
Dear theme developers, do not use javascript to change the basic function of the browser. Disabling links with a # character can have unintended consequences. Especially when you do it as a default behavior. Building software that is potentially dangerous by default can discourage regular WordPress site builders who do not have a background in software engineering from using the platform. Please keep this in mind and make these riskier overrides a well documented option that is off by default.
Thank you for listening. 🙂
If you are a regular WordPress site owner or an agency that builds sites and you need help overcoming a problem, our OnSiteWP One Time Fix It service is designed to be a low cost way to get over your hurdle. Please see our WordPress Support Pricing page for our fix-it service details.
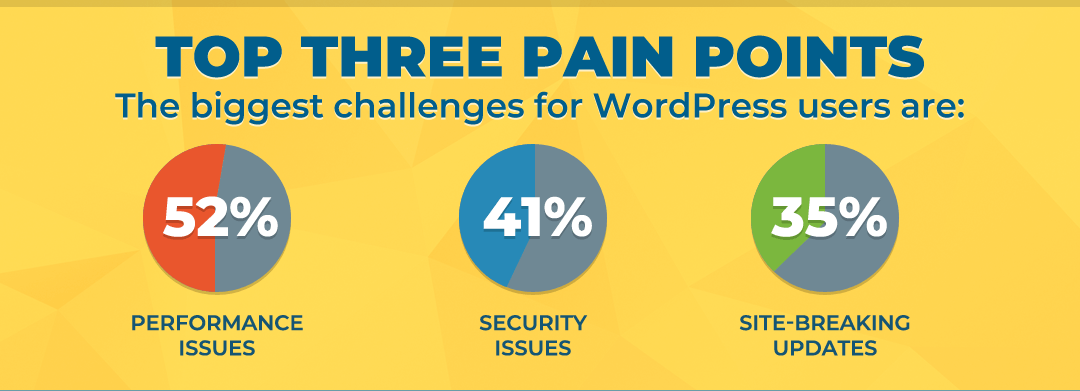
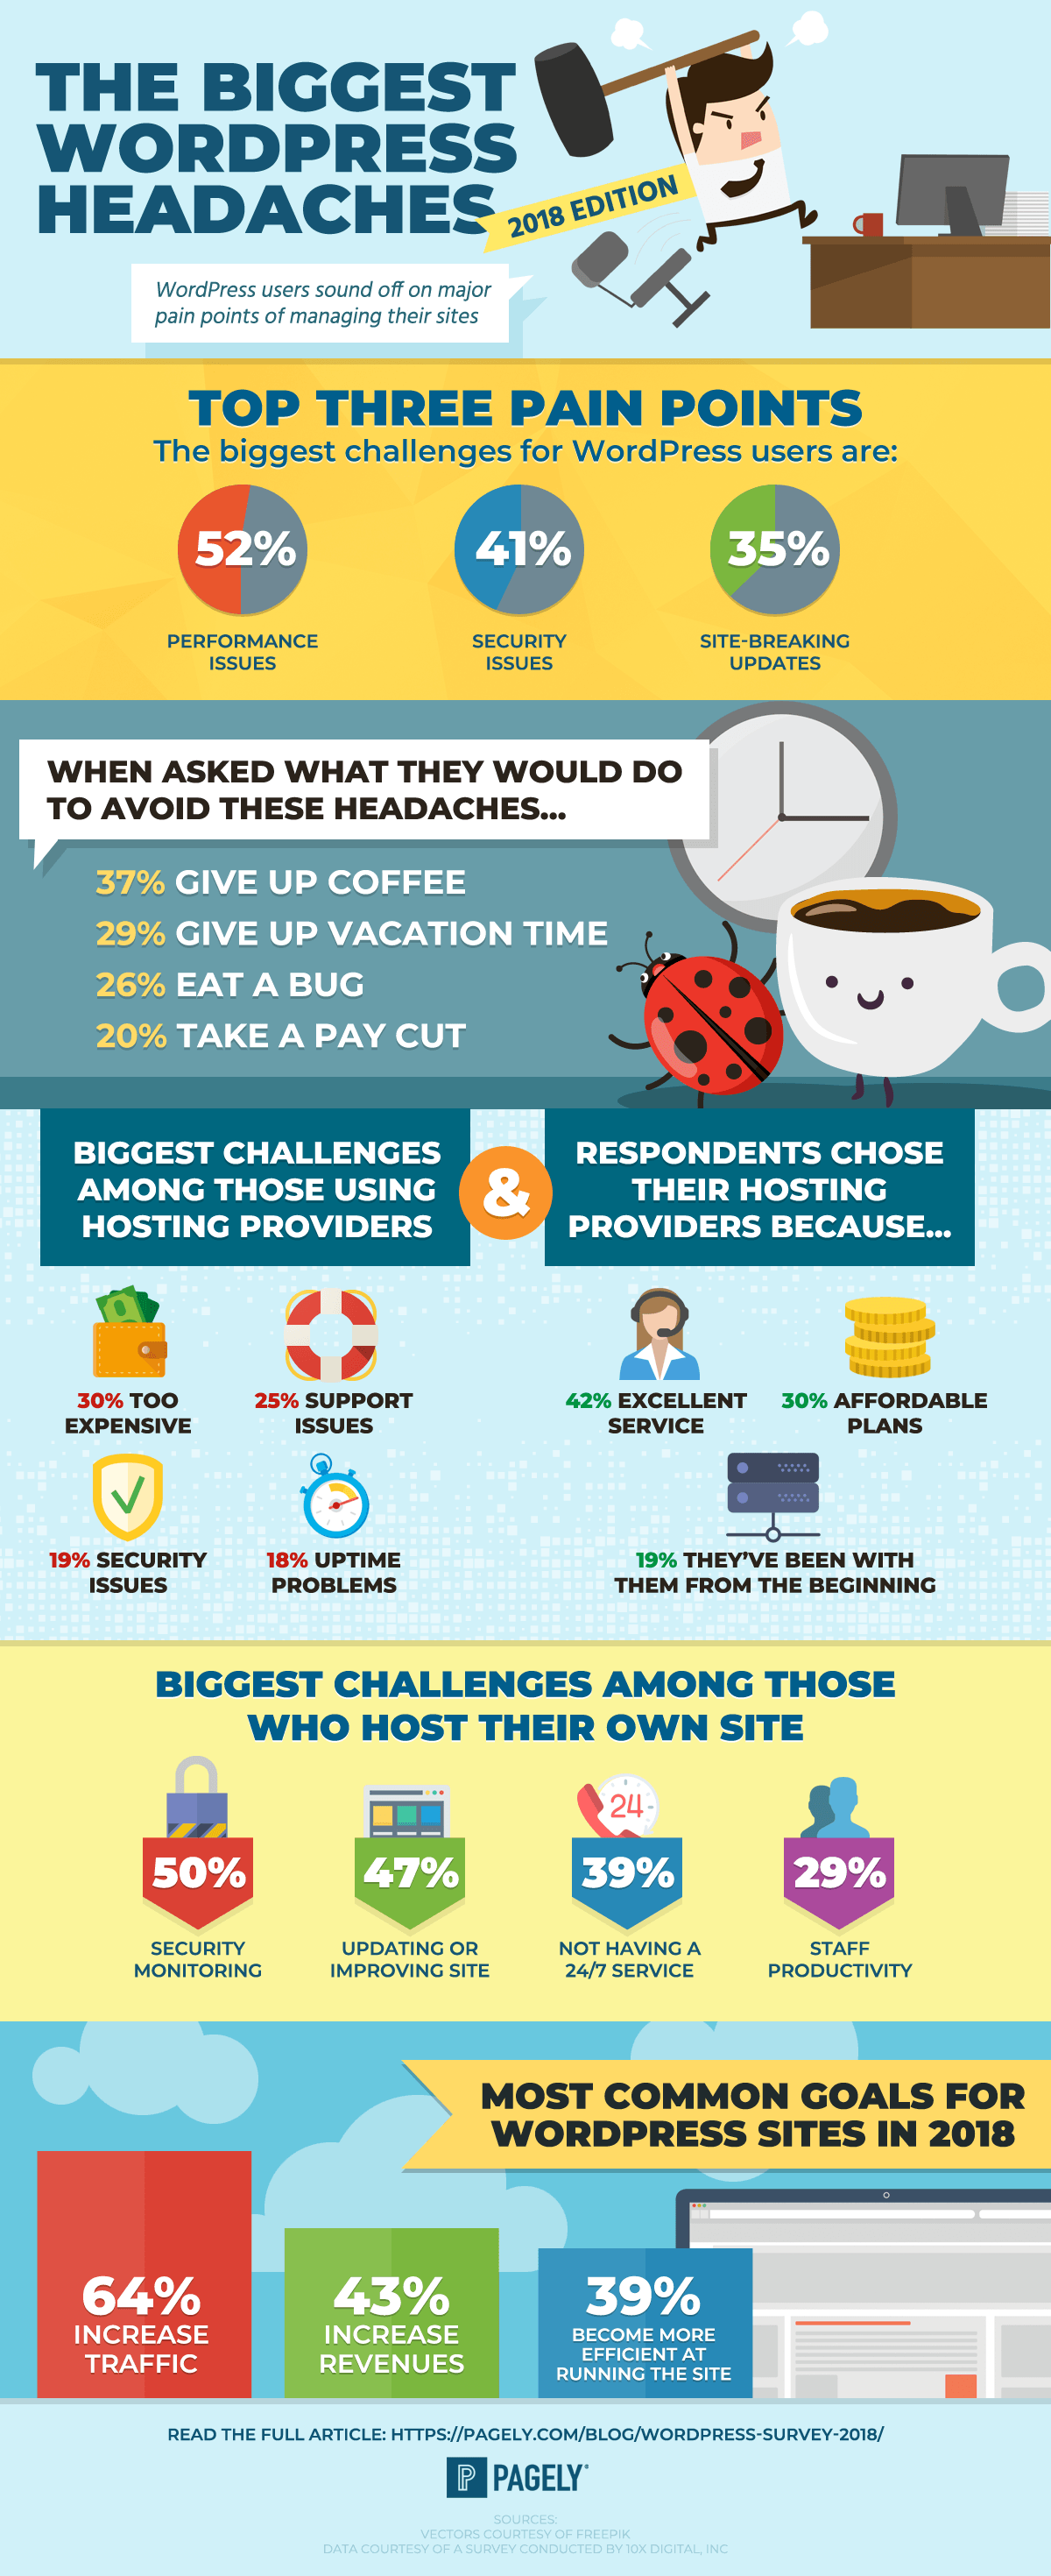
According to a recent survey among WordPress professionals conducted by Pagely, the 3 biggest headaches they experience are the very things that we solve here at OnSiteWP.
Our WordPress Support Services take care of:
Performance Issues (52%)
Security Issues (41%)
Updates that Break Sites (35%)
Shared by permission: https://pagely.com/blog/wordpress-survey-2018/
Don’t give up coffee just to solve these problems.
Join one of our support plans. You Won’t be disappointed. WordPress Support Services
Hi there, Mark Rudder with OnSiteWP.
I’m going to show you how to migrate a website from one hosting environment to
another, or from one hosting company to another.
These are WordPress websites and it’s pretty easy to do.
We’re going to use a few plugins to do it.
Say you’ve decided that you want to upgrade your hosting platform to
run your business, and you’re going to move from one hosting company to another.
Or maybe you’ve built a website for a client and now you need to move it live
to their hosting company or their hosting account.
Or you built it on your localhost and need to move it to a server.
Or say maybe you and your girlfriend we’re sharing hosting and she caught you using Internet Explorer and just told you to move out. Anyway let’s move on.
This site has some some fake content, but it is a real site.
I used a plug-in called FakerPress which creates pages, posts and images to see what new site might look like.
I also noticed it has quite a few spam comments. For a site that has nothing.
it seems to be pretty popular. I guess I ought to get rid of those.
So let’s look at the plugins that I have installed.
I like to start with All-in-One WP Migration. It’s not the only way, but I have found it be one of the easier ways.
I also have Duplicator and UpDraft Plus, which both can be used to migrate a site.
We use UpDraft Plus on all of our client sites for backups.
Off-site is the preferred way to store backups, and much safer than storing them on the same server as your WordPress installation.
We can also use UpDraft Plus to restore a website which is kind of cool as well.
The steps are:
Create a copy of the entire site that will be uploaded to the new hosting server
Create a brand new blank WordPress installation on our new hosting company.
Use All-in-One WP Migration to upload and install the entire site at the new hosting location.
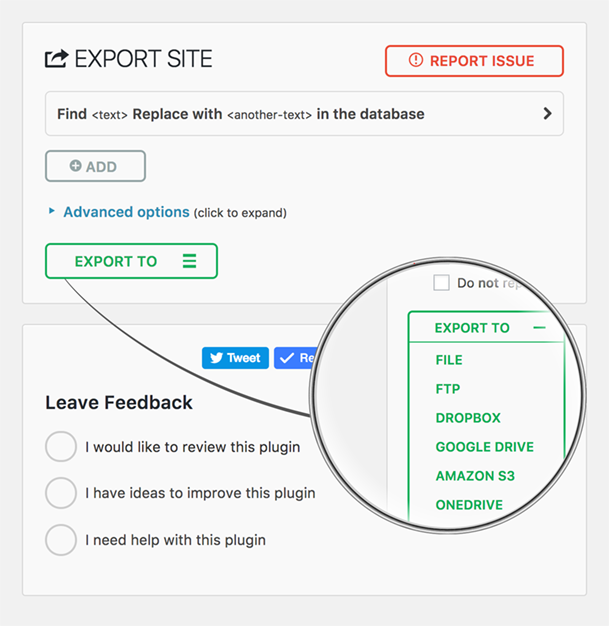
Go to the All-in-One WP migration tool on our exiting site and we’re
going to create a complete copy of the site.
It’s going to create an install-able file to use for migrating.
Click the Export button.
It gives some options where to store the file, but we’re going to just create a downloadable copy.
Download it to our computer where you can find it later.
It won’t take long because this is not a very big site.
If you have a larger site over 500 MBs I can show you how to edit the code a little bit to increase that size, but you have to contact me on our contact form,
or connect with me on LinkedIn. Mark Rudder on LinkedIn.
and I’ll send you info on how to do it.
(if this is already too much info, we include free site migration with all of our hosting plans) WordPress Hosting Services
When it’s done creating the “package”, the package that All-in-one WP migration uses, download that file.
It won’t work with any other plugins. It only works for All-in-one WP Migration
Now we need to go to our new hosting platform or our new hosting Environment.
Yours will be similar to this. This is cPanel with the paper lantern theme.
There are a few things we have to do to set up your new hosting account or platform
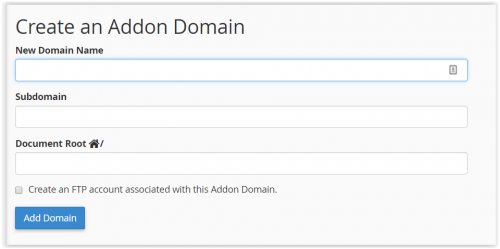
First of all we need to “Addon” the domain name if it wasn’t the one you used when you created the account.
Your domain might be coming from another hosting company or another environment (domain registrar).
It doesn’t matter where it is. The steps are the same.
First, we need to create a place for it on our new hosting account.
Let’s say we finally bought WPblockchain.com for our domain.
This is not available so don’t even check. I wish it was.
(in acknowledgment of the blockchain technology)
Just click Add domain.
Once we create the addon domain it’s going to create a new directory in the root of
our hosting account or our hosting environment.
I’m sure you’re thinking “well how is this going to work if you don’t own WPblockchain.com?”
I’m glad you asked and I’m going to show you how to get around that.
It’s a way to set up in a working WordPress installation and test it before actually launching it or making it “live”.
Once the site is built and tested, then you point the domain name at your domain registrar dns settings.
That way you have no downtime when you’re migrating a site.
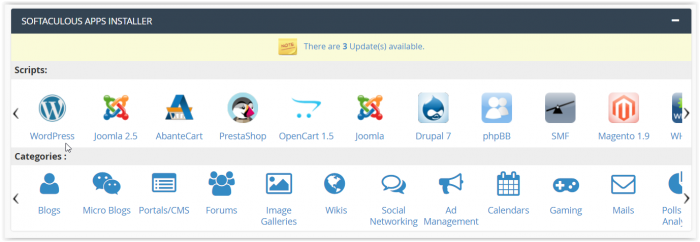
Now we need to spin us up a WordPress site.
You can do that in Softaculous or whatever option your hosting provider offers.
It only takes a minute.
We just click install to create a WordPress installation.
We can use HTTPS for now.
It will probably show the non-secure warning in Chrome but that will get fixed after the new site is up and running.
We need to pick a directory for the new install.
Remove any directory info, otherwise it will install the new site there:
/wp for example. We don’t want this.
If it does get installed in another directory, you won’t be able find your site with just the domain name. Trust me.
Enter a username and password, but keep in mind, this will get overwritten when we move the site over. I normally just use the same username and password for the existing site.
This blank site you’re creating will get wiped out and replaced with the site we are moving. Just use the same login info.
After everything is entered, click install and it’s done.
We will not be able to view our new site because the domain is not pointing to our hosting server… yet.
If you’re keeping the same domain name, it still points to the old server.
You don’t actually don’t want to point the domain name to the new hosting/server until you get the site up and running, and completely working.
You will essentially have two versions of the same site.
After it’s thoroughly tested, can then flip your domain name from your domain registrar over here to the your new hosting account.
I’m going to show you how to get around the domain thing prior to actually pointing it at the domain registrar.
On Windows it’s pretty easy. I’m going to show you how to do it here.
On a Mac, here are instructions: Hosts File on a Mac
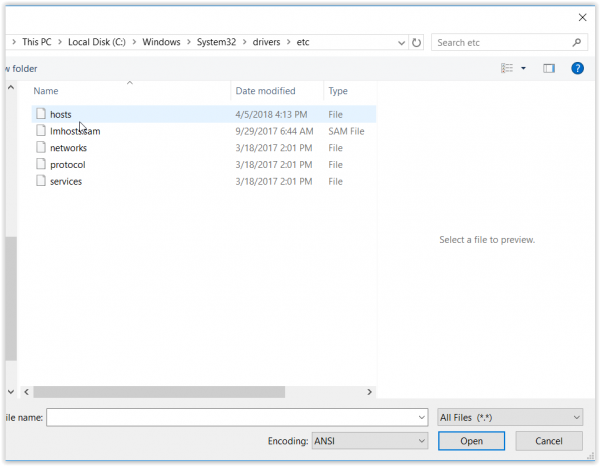
On Windows find notepad, and right click and “run as administrator”.
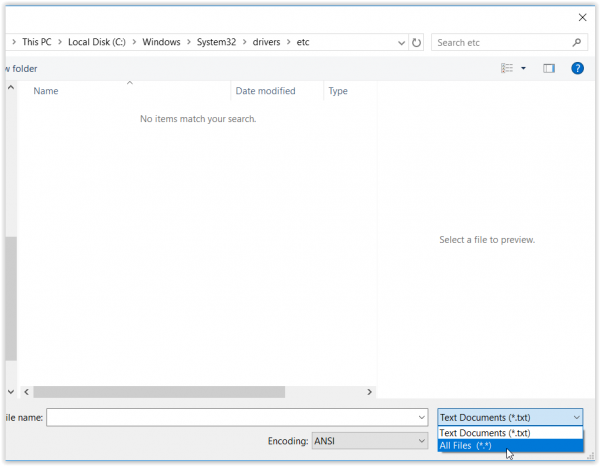
Then we’re going to look for a file called “hosts.
It’s in Windows/system32/drivers/etc
The directory will appear empty because it’s not a standard text file.
It’s a special file.
You will need to select “All Files” in the drop down at the bottom.
We’re changing the dns/domain name locally, on our system, to point to the IP address on our new hosting account.
It’s really simple.
Look in your server info on the new hosting account.
It’s the shared IP address. That’s the number we need.
This is the IP Address of your hosting account.
Copy that and stick into our hosts file and then enter our domain name without the www.
The do it again with www.
We’re telling our computer that if we go to that domain name to use this dns number or IP Address.
Like this:
72.14.192.0 wpblockchain.com
72.14.192.0 www.wpblockchain.com
Save that file. Keep notepad and the Hosts file open in case we made a mistake.
Let’s see if we can now get to our new hosting account and the blank WordPress installation we created. Click on your domainname.com/wp-admin.
You can also click on the link in the WordPress installer in Softaculous in cPanel.
If everything works, you should automatically be in the new site’s backend.
We’re getting an error now because we told it to do SSL/HTTPS but there’s no SSL installed yes.
We use LetsEncrypt on this hosting company, but it won’t install an SSL Certificate until the domain is actually transferred at the domain registrar.
There is not much to the site. It’s just a standard blank WordPress install
Now we will add our all-in-one WP migration plugin.
Just do a search in the plugins area for migration.
Install it.
Now let’s go import the file that you downloaded from the existing site.
It will display a warning that it’s going to overwrite your database, media, plugins and themes.
It will overwrite the entire website and all the files at this location. It’s an empty site so it’s fine.
This includes all usernames and passwords.
This is why we just use the same login info for both sites.
After it completes the upload just click close.
Because I didn’t change my admin email, it’ll be very difficult to reset it, so I
use LastPass username/password for our previous site.
We copy username/password from our the existing site and log back in.
The site is essentially installed
it’s overwritten everything, which means we have a cloned website.
All content, users, everything.
Click the Update Permalinks button and the dialog will close and you will be logged out.
Log back in and update the permalinks.
The most common permalink structure is %postname% and is generally accepted as the best for SEO.
Now let’s go look at the front of the site see what we have.
It should be a complete cloned version but on a different hosting server.
Check the site and make sure everything is working and all content is there.
We cheated the DNS system for the URL by using the hosts file.
This is how you move and migrate a site.
Now you need to go into your domain registrar and point the domain to your hosting
company by changing the name servers.
For example: OnSiteWP Hosting uses:
NS1.onsitewp.com
NS2.onsitewp.com
It may take some time for the DNS to update your domain to the new IP address.
Once it is resolving to the new host, delete the dns numbers in the hosts file.
That’s how it’s done.
Thanks for watching.
We offer free site migration when you join our hosting service.
Check out the plans here. WordPress Hosting Services
Excellent service is the number one goal at OnSiteWP. Our WordPress support service grew from the fact that we saw many neglected websites.
We hear a lot of reasons why websites fall behind in updates. It ranges from my developer is supposed to be doing them to I didn’t know updates were needed. Other people know updates are needed but fear breaking something.
Whatever the reason, having a website on the internet comes with great responsibility. You can shoulder that responsibility yourself or you can use a WordPress maintenance company like OnSiteWP to handle the upkeep of your website for your business.
The most successful businesses in the world have a good manager at the top. You don’t think Tim Cook, the CEO of Apple, is applying updates to the apple.com website, do you? No, he conducts an orchestra of salesmen, marketers, financiers and engineers to make his business outperform all of the others in his market.
This is the mindset you need for your business. Be a specialist in what you do best and form a team of professionals to handle the areas which take away from your core mission.
In the same way you hire a CPA for accounting and an attorney for legal matters, a company like OnSiteWP will keep your website operating problem free. (and we’re affordable too)
Before you leave to type “wordpress support services” into Google, let me tell you a little secret. Not all WordPress support companies are the same.
About WordPress Support Companies
WordPress support companies come in a wide variety of sizes and experience levels.
Some are hardly considered companies. They are a single guy, working from his house, who has never filed for incorporation and is starving for business. Mark and I have witnessed these people telling the potential client anything to get their business. While it is unfair to generalize, we think this is the riskiest person to do business with.
On the opposite end of the spectrum you find “enterprise” oriented support companies. They charge thousands of dollars per month to give you support. Their clients are the multinational corporation who may have an internal IT staff but also want a WordPress support specialist on call just in case a problem crops up that requires collaboration.
The most common WordPress support company you’ll likely run into is a web development agency who also does maintenance. They have real clients who they have done work for. The danger is building a website and maintaining a website require vastly different processes.
Building a site is project based — a sale is made, a few weeks of labor is performed, the finished site is launched. Then on to the next development project.
Maintaining a website is an ongoing service. It needs to be done regularly (weekly at a minimum). It isn’t creative like building a logo and has serious security consequences if nobody gets around to doing the updates.
This is why support specialists like OnSiteWP are here. WordPress support is what we do. We have special software tools designed to maintain your website. We will see when plugins need to be updated and with several of us on staff, we make sure a tech’s vacation schedule doesn’t stop your updates from being performed.
Our staff includes people who understand business, experienced designers, and some of the best IT server hosting talent you will come across in the WordPress space. We are all based in the U.S. and communicate at the proper tech level from respectful high level situation overviews down to “here talk to my IT guy” level depending on how much detail you want to hear.
And most of all contact us with any questions you may have. We will be happy to get you onboarded or point you in the right direction if we think you will be better served elsewhere.


![WordPress Website Migration [Video]](https://dtb24j9dud7b2.cloudfront.net/wp-content/uploads/Moving-a-WordPress-Website-to-a-new-host-1080x675.jpg)